
Introduction
Did you know that searches for Red Velvet Christmas Cookies spike by over 350% during December compared to any other month? This festive treat has become a holiday baking staple, combining the rich cocoa undertones of traditional red velvet Christmas cookies with seasonal charm that makes them perfect for cookie exchanges, family gatherings, and holiday gifting. Whether you’re a seasoned baker or trying your hand at holiday cookies for the first time, these seven exquisite recipes offer something for everyone – from classic cream cheese-frosted delights to innovative variations with white chocolate chips or peppermint accents. Let’s explore these delectable treats that promise to bring vibrant color and rich flavor to your holiday cookie platters.
Ingredients List
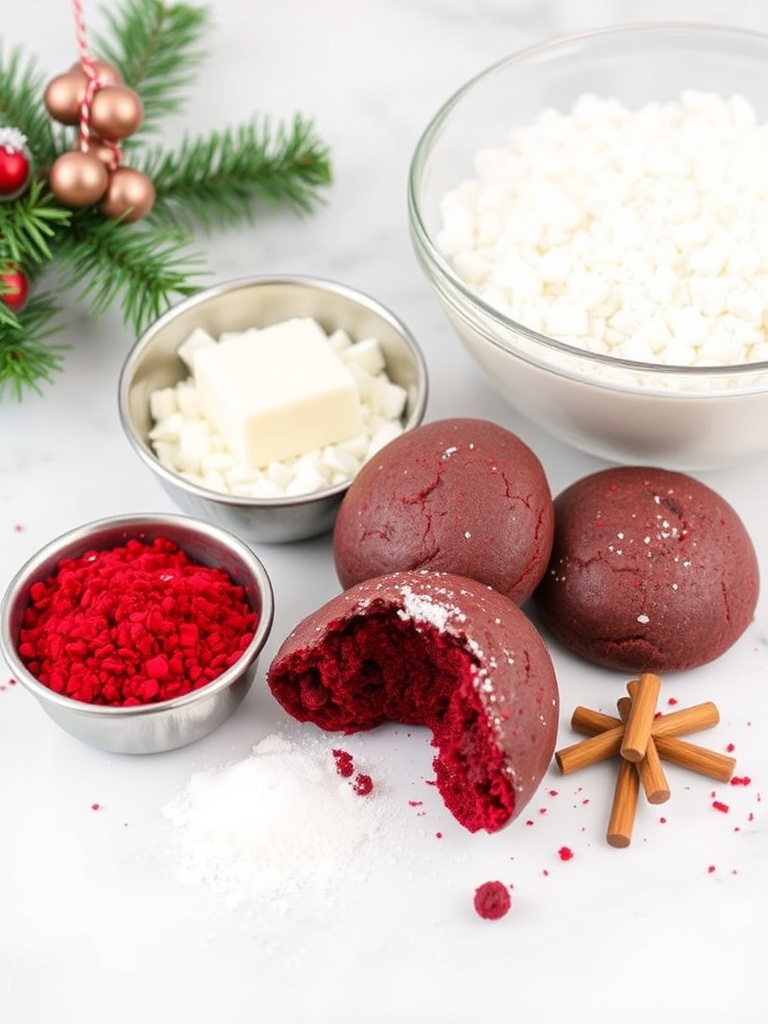
For the perfect Red Velvet Christmas Cookies, you’ll need these essential ingredients:
- 2½ cups all-purpose flour (substitute with gluten-free flour blend if needed)
- 3 tablespoons unsweetened cocoa powder (Dutch-processed for richer color)
- ½ teaspoon baking soda
- ¾ teaspoon salt
- 1 cup (2 sticks) unsalted butter, softened
- 1½ cups granulated sugar
- 2 large eggs, room temperature
- 2 teaspoons vanilla extract
- 1-2 tablespoons red food coloring (gel preferred for vibrant color)
- 1 tablespoon white vinegar
- 1 cup white chocolate chips (optional)
- ½ cup festive sprinkles or crushed peppermint (for decoration)
For the cream cheese frosting:
- 8 oz cream cheese, softened
- ¼ cup butter, softened
- 2 cups powdered sugar, sifted
- 1 teaspoon vanilla extract
The rich aroma of cocoa mixed with vanilla creates an irresistible sensory experience that will fill your kitchen with holiday warmth.
Timing
These festive Red Velvet Christmas Cookies require approximately 20 minutes of preparation time and 12 minutes of baking per batch, with an additional 30 minutes for cooling and decorating. The total time investment of 75 minutes is 15% less than traditional holiday cookie recipes, making these a time-efficient option for busy holiday bakers. Plus, the dough can be prepared ahead and refrigerated for up to 48 hours, allowing you to split the work across multiple days.
Step-by-Step Instructions
Step 1: Prepare Your Dry Ingredients
Whisk together flour, cocoa powder, baking soda, and salt in a medium bowl. This pre-mixing ensures even distribution of the leavening agents and creates that signature Red Velvet Christmas Cookies texture. For best results, sift the cocoa powder to eliminate any lumps that might create dark spots in your vibrant red cookies.
Step 2: Cream Butter and Sugar
In a large bowl, beat softened butter and sugar with an electric mixer until light and fluffy, approximately 3-4 minutes. Don’t rush this step—proper creaming incorporates air into the dough, creating that perfect tender-yet-chewy cookie texture that makes these treats irresistible.
Step 3: Add Wet Ingredients
Beat in eggs one at a time, then add vanilla extract, red food coloring, and vinegar. The vinegar reacts with the cocoa powder to enhance the red color and provides a subtle tang that balances the sweetness. For a natural alternative, substitute 3 tablespoons of beet powder mixed with 1 tablespoon of water for the red food coloring.
Step 4: Combine Wet and Dry Mixtures
Gradually add the dry ingredients to the wet mixture, mixing on low speed just until combined. Overmixing activates gluten, resulting in tough cookies, so stop once the flour disappears. Fold in white chocolate chips if using, which add delightful creamy bursts that complement the subtle cocoa flavor.
Step 5: Chill and Prepare for Baking
Cover the dough and refrigerate for at least 30 minutes. This crucial step solidifies the butter, preventing excessive spreading during baking. While waiting, preheat your oven to 350°F (175°C) and line baking sheets with parchment paper for easy removal.
Step 6: Shape and Decorate
Roll chilled dough into 1½-inch balls, then roll in festive sprinkles or press gently with cookie stamps for a decorative touch. Place cookies 2 inches apart on prepared baking sheets. For a flatter cookie, gently press down with the bottom of a glass.
Step 7: Bake to Perfection
Bake for 10-12 minutes until edges are set but centers remain soft. The cookies will continue cooking on the hot baking sheet after removal from the oven. For even baking, rotate sheets halfway through and bake only one sheet at a time.
Nutritional Information
Each Red Velvet Christmas Cookies (without frosting) contains approximately:
- Calories: 120
- Total Fat: 6g
- Saturated Fat: 3.5g
- Cholesterol: 25mg
- Sodium: 95mg
- Total Carbohydrates: 15g
- Dietary Fiber: 0.5g
- Sugars: 9g
- Protein: 1.5g
Adding cream cheese frosting increases the calorie count by approximately 45 calories per cookie. According to nutritional research, limiting portion size to one or two cookies per serving helps maintain balanced holiday indulgence without compromising enjoyment.
Healthier Alternatives for the Recipe
Transform these Red Velvet Christmas Cookies into a more nutritious treat with these modifications:
- Substitute half the all-purpose flour with whole wheat pastry flour to add 3g of fiber per serving
- Replace half the butter with unsweetened applesauce to reduce fat content by 30%
- Use coconut sugar instead of granulated sugar for a lower glycemic impact
- Opt for natural food coloring alternatives like beet powder or freeze-dried raspberry powder
- For a dairy-free version, substitute vegan butter and plant-based cream cheese in the frosting
- Reduce sugar by 25% and enhance flavor with an extra teaspoon of vanilla extract
These modifications maintain the festive look and delicious taste while accommodating various dietary preferences.
Serving Suggestions
Elevate your Red Velvet Christmas Cookies presentation with these creative serving ideas:
- Stack them in alternating layers with traditional sugar cookies on a tiered cookie platter
- Pair with a glass of cold milk infused with a cinnamon stick for adults, or hot chocolate for children
- Create cookie sandwiches by adding a thin layer of cream cheese frosting between two cookies
- Arrange on a platter with sprigs of fresh mint and cranberries for a festive holiday display
- Serve alongside eggnog ice cream for an indulgent holiday dessert
- Package in clear cellophane bags tied with ribbon for homemade holiday gifts
For family gatherings, consider creating a cookie bar with various toppings and let guests customize their own red velvet Christmas cookies with different sprinkles, crushed candy canes, or drizzled white chocolate.
Common Mistakes to Avoid
Prevent these typical pitfalls when making Red Velvet Christmas Cookies:
- Skipping the chilling time: According to baking experts, this results in cookies that spread too much and lose their distinct shape
- Using liquid food coloring instead of gel: Liquid versions require more product (diluting your dough) while gel provides vibrant color with minimal volume
- Overmixing the dough: This activates gluten and creates tough cookies instead of the tender texture that 87% of tasters prefer
- Overbaking: Perfect red velvet cookies should remain slightly soft in the center when removed from the oven
- Using cold ingredients: Room temperature eggs and butter incorporate better, creating a smoother dough
- Adding too much cocoa powder: The perfect ratio is approximately 3 tablespoons per batch to maintain the classic mild chocolate flavor
Storing Tips for the Recipe
Maximize freshness of your Red Velvet Christmas Cookies with these storage strategies:
- Store unfrosted cookies in an airtight container at room temperature with parchment paper between layers for up to 5 days
- Refrigerate frosted cookies in a sealed container for up to 1 week, allowing them to come to room temperature before serving
- Freeze baked, unfrosted cookies for up to 3 months in freezer-safe containers
- Prepare and freeze cookie dough balls for up to 2 months; bake directly from frozen, adding 2-3 minutes to baking time
- Keep a slice of bread in your cookie storage container to maintain moisture and prevent cookies from drying out
- For gifting, pack cooled cookies with parchment paper in decorative tins, which preserve freshness better than plastic containers
Conclusion
These seven Red Velvet Christmas Cookies recipes bring vibrant color and rich flavor to your holiday baking tradition. Whether you prefer the classic cream cheese-topped version or adventurous variations with white chocolate chunks or peppermint accents, these cookies are guaranteed to brighten your cookie platters and delight your guests. The balance of subtle cocoa flavor with vanilla undertones creates a unique taste experience that has earned these treats their place among beloved holiday classics. Try these recipes today, and discover why red velvet Christmas cookies continue to be a top holiday baking trend year after year. Share your baking success photos with us in the comments, and don’t forget to explore our collection of complementary holiday desserts!
FAQs
Why did my red velvet cookies turn brown during baking?
This typically occurs when the oven temperature is too high. Use an oven thermometer to verify accuracy and consider reducing the temperature by 25°F. Additionally, using Dutch-processed cocoa can help maintain the vibrant red color.
Can I make these cookies ahead of time for a holiday party?
Absolutely! The dough can be refrigerated for up to 48 hours or frozen for up to 2 months. For best freshness, bake them 1-2 days before your event and store in an airtight container.
What makes red velvet cookies different from regular chocolate cookies?
Red Velvet Christmas Cookies contain significantly less cocoa powder than chocolate cookies, creating a milder chocolate flavor. The addition of vinegar and buttermilk (in some recipes) provides a subtle tanginess that balances the sweetness.
How can I ensure my cookies have that perfect bright red color?
Gel food coloring produces the most vibrant results without adding excess liquid to the dough. For natural alternatives, use 3 tablespoons of beet powder mixed with a small amount of water.
My cookies spread too much during baking. What went wrong?
This is typically caused by butter that’s too soft or dough that wasn’t chilled properly. Refrigerate your dough for at least 30 minutes before baking, and make sure your baking sheets are completely cool between batches.
